It will soon be the kind of weather for Fall where we
I looked at a few ideas online before deciding on a square layered look. I selected a scrapbook paper patterns that had the colors or fall which are usually shades of browns, reds, oranges, and yellows. I did not end up using the light pink or black paints. If you have great handwriting, you can write your own lettering on the card. My handwriting is atrocious, so I already had letter stickers I use often. You can also print lettering on paper.
Products Used:
2 sheets of 8.5”X11” white cardstock paper
2 sheets of 4”X6” cardstock paper
1 sheet of 6”X6” gold cardstock paper
2 sheets of 12”X12” scrapbook paper
Fall-themed colors of acrylic paints and small paintbrush
Sticker word book
Not Pictured:
Tape and scissors

First fold and cut the white 8.5”X11” cardstock which will be the blank white card. I made two sizes of 6.5”X5” and a 7.5”X4.5” card. Make sure you make card and envelope sizes that adhere to the USPS guidelines for letter stamps, found here: https://www.usps.com/business/prices.htm.
I then cut the smaller 4”X6” cardstock paper to fit the front of the card with a bit of white trim left exposed to achieve the layered look. Then, I used the spare white cardstock along with the gold cardstock to cut layered squares, leaving some of the gold trim exposed. These ended up being 4.5”X3.5” and 3.5”X3.5” sizes for the gold cardstock.


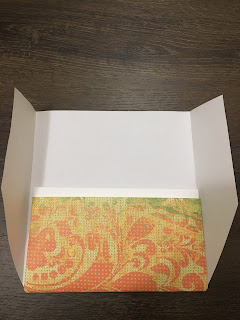
Now onto the envelopes! (see above)
Using the white card as a guide, place it in the center of the 12”X12” scrapbook paper and fold it up over the card leaving a little trim of the card exposed. Then take the card out of the pocket you just created and place it on top of the scrapbook paper lining the bottoms together and use scissors to cut off the corners in an angle.


Open up the scrapbook paper, keeping the folds intact. Keep the small portion where you had the card as a guide closest to you. The picture displayed is upside down so don't get confused! Then, slip the card back inside the pocket you created and fold the angles around the card to secure the pocket. It's a bit hard to explain, but once you're actually working with the paper you will be able to understand these movements.

Fold the side corners over the card and then cut the top to fit however long you’d like the fold to go down covering the card. About a 2.5” trim is what I used.
Fold the top down and voila! Beautiful envelopes done!
Now time to paint! Again I only used three colors that were more Fall themed. The key is to have a very watered-down brush when you paint because you may be using such dark colors like I did. A wet brush is how you can create lighter-colored brush strokes across the small white squares.

For the cut-outs of the foliage and leaves, I would recommend printing out a clip-art from online and then tracing it over the gold cardstock. I opted for the free-hand drawing.

As you can see below, I also painted lines in the leaves using orange paint to add some depth. When everything dries, assemble the cards in a layered fashion using tape for each layer. For the gold foliage cut-outs, I used tape on the back rather than the front because I wanted to keep the shine of the gold.
Add the word stickers, or handwrite ‘thankful’ with a black marker perhaps. When you are done, keep the cards in-between a heavy stack of books to force it into a flat shape because using watered-down paint made the white cardstock curl up a bit.
Send it to a friend or family member to drop a lovely and personal note of ‘HELLO’ to kick off a great Fall season and start to say your ‘goodbyes’ to 2020!


No comments:
Post a Comment