Saturday, August 29, 2020

Fall Holiday Cards


It will soon be the kind of weather for Fall where we will have cool and crisp mornings for pumpkin-flavored coffee and tea as we get all cozy with our sweaters!  Now is a great time to get your holiday cards prepared.  I think Fall cards will brighten anyone’s day, so here’s a fun DIY Fall card craft to plan in the weeks ahead.  


I looked at a few ideas online before deciding on a square layered look.  I selected a scrapbook paper patterns that had the colors or fall which are usually shades of browns, reds, oranges, and yellows.  I did not end up using the light pink or black paints.  If you have great handwriting, you can write your own lettering on the card.  My handwriting is atrocious, so I already had letter stickers I use often.  You can also print lettering on paper.


Products Used:

2 sheets of 8.5”X11” white cardstock paper

2 sheets of 4”X6” cardstock paper

1 sheet of 6”X6” gold cardstock paper

2 sheets of 12”X12” scrapbook paper

Fall-themed colors of acrylic paints and small paintbrush

Sticker word book


Not Pictured:
Tape and scissors


First fold and cut the white 8.5”X11” cardstock which will be the blank white card.  I made two sizes of 6.5”X5” and a 7.5”X4.5” card.  Make sure you make card and envelope sizes that adhere to the USPS guidelines for letter stamps, found here: https://www.usps.com/business/prices.htm.


I then cut the smaller 4”X6” cardstock paper to fit the front of the card with a bit of white trim left exposed to achieve the layered look.  Then, I used the spare white cardstock along with the gold cardstock to cut layered squares, leaving some of the gold trim exposed.  These ended up being 4.5”X3.5” and 3.5”X3.5” sizes for the gold cardstock.


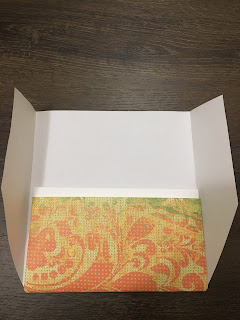
Now onto the envelopes!  (see above)  

Using the white card as a guide, place it in the center of the 12”X12” scrapbook paper and fold it up over the card leaving a little trim of the card exposed. Then take the card out of the pocket you just created and place it on top of the scrapbook paper lining the bottoms together and use scissors to cut off the corners in an angle. 


Open up the scrapbook paper, keeping the folds intact.  Keep the small portion where you had the card as a guide closest to you.  The picture displayed is upside down so don't get confused!  Then, slip the card back inside the pocket you created and fold the angles around the card to secure the pocket. It's a bit hard to explain, but once you're actually working with the paper you will be able to understand these movements. 


Fold the side corners over the card and then cut the top to fit however long you’d like the fold to go down covering the card.  About a 2.5” trim is what I used. 


Fold the top down and voila!  Beautiful envelopes done!


Now time to paint!  Again I only used three colors that were more Fall themed.  The key is to have a very watered-down brush when you paint because you may be using such dark colors like I did.  A wet brush is how you can create lighter-colored brush strokes across the small white squares. 


For the cut-outs of the foliage and leaves, I would recommend printing out a clip-art from online and then tracing it over the gold cardstock.  I opted for the free-hand drawing.


As you can see below, I also painted lines in the leaves using orange paint to add some depth.  When everything dries, assemble the cards in a layered fashion using tape for each layer.  For the gold foliage cut-outs, I used tape on the back rather than the front because I wanted to keep the shine of the gold.  


Add the word stickers, or handwrite ‘thankful’ with a black marker perhaps. When you are done, keep the cards in-between a heavy stack of books to force it into a flat shape because using watered-down paint made the white cardstock curl up a bit. 


Send it to a friend or family member to drop a lovely and personal note of ‘HELLO’ to kick off a great Fall season and start to say your ‘goodbyes’ to 2020! 


Friday, August 7, 2020

Upcycled Wine Bottles

I recently wrote a blog (click HERE if you want to read it) about how I’m going to try to reduce the glass I purchase because Hillsborough County and other counties in Florida are no longer recycling glass, which is outrageous and horrendous for the environment. So, until we can change things I’m trying not to buy glass. Which means I have to find some ways to reuse the wine bottles I already had before this new policy. I looked online for ideas and there were lots of people making wine bottles into decor. There are lots that are way better than mine, but the idea is to try something new and have some fun while staying home, so in that sense Mission Accomplished! I also tried to use only things I had on hand at home. The only thing I bought was Chalkboard Paint, which I got at Target for $6.99.


I decided on two styles for this blog using one clear bottle and one green bottle. For the clear one, I decided on a beach theme like with my Altoids tin, and for the green bottle I used the Chalkboard Paint. I’ve seen the best results for these projects when done with spray paint but since I live in an apartment I didn’t want to try to spray paint on my balcony in case someone complained about it. So, I used fluid Chalkboard Paint and the acrylic paint I already had but a spray paint would probably work better. You’ll see what I mean later.


Step 1: Wash the bottles and remove the labels


I used a box cutter to remove the label from the neck of the bottle. 


Online I saw many different ways to remove the labels from the front and back but I wanted something simple. I soaked these in hot soapy water. I found some of the labels came free right away but others, like the one on the clear bottle, took longer and a little work. For the stubborn labels I just used a spoon to scrape the label off. I opted for a spoon because it’s safer than using a knife and worked pretty well.


Step 2: Gather Your Materials


I washed a few different bottles so you can see not all wine bottles are exactly the same shape and color so if you’re making matching bottles for a centerpiece or a mantle you want to make sure your bottles are the same.


Now that I have my bottles, I gathered my other materials. You will need rubbing alcohol, paint or spray paint, Chalkboard Paint, paint brushes (I used foam brushes), chalk or pastels, Mod Podge, painter’s tape, hot glue, washi tape, and any other decorations you want like letters, stencils, stickers, beads, glitter, etc. I have sand, shells, paper, and some leather cord for my beach themed bottle, and yarn for the Chalkboard bottle.


Step 3: Marking where you want to paint, cleaning, and painting


I forgot to get painters tape so I’m using washi tape instead. Put the tape where you are going to paint and clean the areas you will paint with rubbing alcohol. The was noted specifically for the Chalkboard Paint but I think it’s a good idea for acrylic paint too.


I applied the paint in thin even coats, letting it dry for at least an hour between coats. I thought using foam brushes would prevent streaks but I still got some streaking, so I think the best way to prevent that is by using spray paint. Honestly I don’t mind the streaks; it makes it seem more rustic and homemade. 


Step 4: Decorate!


Bottle 1: Beach Theme


The first thing I did was remove the washi tape I was using as painter’s tape to block off the sections I painted. I recommend doing this over some newspaper or something similar because the dried paint makes a mess, at least mine did, little splinters of paint went everywhere. Then I used washi tape to decorate the bottle and sealed the paint and the washi tape with Mod Podge. I also added some sand and tiny sea shells and a rolled up piece of paper for my “message in a bottle” look. If I did this again I would probably wait to add stuff to the inside until after I finished the outside. 


The sand I had from one of the times I went to the beach years ago (note: do not remove sand from the beach! You can buy sand in stores, also never remove sand from beaches in Hawaii or you’ll be cursed). The tiny shells are the same ones from the Altoids tin craft.


Finally I used some blue leather cord to tie a few larger shells to the outside. I’m really happy with how this turned out. I’ve seen some where crafters use twine to make fishnet style decorations to go over the bottle. It looks very coastal chic but I didn’t even know how to start something like that and I didn’t have any twine. I did add a cork to the bottle at the very end to keep the sand and other items from falling out.


Bottle 2: Chalkboard Chic


After I removed the painter’s tape (aka washi tape) I started hot gluing some pink and green yarn to the parts of the bottle that weren’t painted. You can do this with twine which makes a nice neutral look but I had this yarn leftover from another project and it wasn’t enough to make anything so that’s why I chose it for this.


You can see the streaks here from painting on the Chalkboard paint. I think spray paint would give you a smooth finish, but again I kinda like that handmade brush look. I did a thick layer of the yarn overlapping it in spots where the hot glue was visible so it looked nice and clean when I finished and no hot glue was showing. It was tricky doing this with hot glue because it wanted to stick to the yarn and the yarn is fuzzy so it wanted to stick to everything but I got through it. I suggest taking your time  and apply the glue as thinly as possible. You have to be quick so the glue doesn’t dry but try doing just little sections at a time.


I did the same for the yarn on the top of the bottle. Then I used these letter stickers to put my initials on the bottle. Since these letters are stick on and have little holes I used a bit of thread to tie them on because I don’t think a sticker would last on yarn for very long, this way they are secure.


You could also do multiple bottles like this and write your initials or a message with the chalk instead of stickers. I decided to do a stencil image instead of writing a message because my handwriting is terrible and writing on a bottle just didn’t work for me.


When the Chalkboard Paint is completely dry you’re ready to write with chalk or pastels on your bottle. I heard/read somewhere that you need to prime the surface. I’m not sure if that’s true but I did it anyway. To do this I just rubbed a little white chalk over the surface then wiped it off with a tissue. Then I applied this stencil and went over it with a red pastel.


Here’s the finished bottle! I love the Chalkboard because I can change this image or write a message or maybe make a list of my top wines. You can do anything you want and change it up. I’m just using this as an art piece but you can use them as vases too.


Saturday, August 1, 2020

Acrylic Painted Coasters


If you read the post on the Welcome Wreath, I mentioned a friend who recently purchased a home.  Well, this coaster set will be another housewarming gift!  There are a lot of ideas on Pintrest, but this acrylic paint method was most appealing to me.  

It was such a fun experience and I can’t wait to make all of my friends a set of coasters for birthdays and upcoming holiday gifts.

Hope you enjoy this project to keep you busy in quarantine! 


The tiles were purchased at Lowes.  I went into the store because I wanted to touch and feel the tile to be sure it would work.  I also wanted to purchase plant pots for a few plants.  You must wear your mask, even in the garden center, and definitely in the store. It was a great (and quick!) experience.  

The cork packing was purchased at Dollar Tree which was in the ‘Wood, etc’ section.   I already had the acrylic paint, masking tape, cups, brushes, glitter, and Mod Podge Acrylic Sealer. 

Products Purchased:
4”x4” White Gloss Wall Tile
4 Purchased:  $0.60 from Lowes (total price!)

Adhesive Cork Sheet by Crafter’s Square
$1.00 from Dollar Tree

(Products I owned)
Acrylic Paints from Michaels
Masking Tape (but please use Painter’s Tape instead!)
Paper Cups with water droplets
Small brush
Paper Plate to catch the dripping paint
Mod Podge Super Hi-Shine Acrylic Sealer
Optional glitter powder


I first used the masking tape to seal off half of the tile since that’s the look I liked best.  It would give a crisp cut kind of look.  Please note:  The masking tape did not catch the paint mixture fully as it seeped through the line so I recommend using proper painters tape which I will try for the next one!


To make the paint mixture, I first used a tablespoon of tap water and then added two drops of paint.  However, it was very watery still so I ended up with each cup having six drops of paint into a tablespoon of water.  It turned out to be a 50/50 ratio of paint to water to make this kind of clear-paint look.  For the next set of coasters I will try a 70/30 paint to water ratio to make the colors pop a bit more.  Stay tuned for that one!  I used the end of the small paint brush to stir the mixture together.


Keep the paper plate under your working space as you do the pouring.  First, I picked up the tile, holding the corner which was taped-off.  With my other hand, I held and the paper cup about two inches above the tile and then tilted it to pour the blue paint mixture onto the tile. Then I picked up the yellow paint cup and poured a bit directly into the blue paint circle on the tile.  Then I moved the tile piece from side to side to “swish” the paint around the white space of the tile to fully cover it.  Be careful as the paint mixture will be dripping onto the paper plate below! 


I used the small paint brush to pull some of the paint to the edge where it wasn’t going naturally with the pull of the paint mixture.  I then set each tile onto a used plastic package to set and dry.  It was a beautiful thing to see! 


I liked the look, but thought it needed a little something extra.  I found some glitter make-up that I never use, and used the small brush to lightly tap some of the power mixture into the wet paint.  It was so interesting to see the result because it made the paint kind of bubble up.  How cool is science?! 


Here is the final look of the painting and glitter-sprinkle process!


I let it dry for about 30 minutes.  Since there was a 50/50 water to paint ratio, it dried quickly.  I then moved the tiles outdoors to spray the Mod Podge Acrylic Sealer.  After the first spray layer, I came back to check on it and go in for the second spray later and to my surprise there were black specks on the white corner of the tile!  I realized that because it was a very windy day in Chicago, and I had just planted pots on the deck, a lot of soil was still on the deck that I didn’t see and the wind blew it onto the tile with the sticky sealant!  Luckily, I was able to blow most of it off, but some soil specks were settled in to stay and have now become part of the coaster!  

Lessons learned here will hopefully help you to avoid this added art element when you do any outdoor work! 


Once the sealer was totally dry, I cut out the cork squares from the cork sheet and placed them to the back of the tile.  I applied pressure to all sides of the tile to ensure it adhered well.  It’s essential for the sealer to be fully dry to do this step, so I’d let the sealer dry for at least an hour.  The tiles came out so beautiful, I can’t wait to do more.


If you do this project, comment below and we would love to see how they turned out!